- Đăng vào
Build lại Nginx từ source code trên Windows 11
Giới thiệu
Trong các bài viết trước về chủ đề Kubernetes cluster trên Microsoft Hyper-V server, mình có đề cập đến việc sử dụng Nginx làm Reverse Proxy trên hệ thống của mình. Tuy nhiên với nhu cầu sử dụng riêng, bản build mặc định không còn phù hợp nên mình có thêm một vài module dẫn đến phải tự build lại. Việc build lại Nginx trên Windows hơi phức tạp, dưới đây là tóm tắt 1 vài bước mà mình đã thực hiện với:
- Windows 11
- Nginx 1.21.3
Cài đặt công cụ
- Microsoft Build Tools 2019 khi cài đặt chọn Desktop development with C++
- Git dành cho Windows https://git-scm.com/download/win
- Perl environment Perl for MS Windows
- Sed dành cho Windows https://github.com/mbuilov/sed-windows. Sau khi cài xong nhớ thêm folder đó vào PATH Environment.
- Nginx source code https://github.com/nginx/nginx
Download thư viện
Tiến hành
- Dùng git lấy source code và checkout tag release-1.21.3
git clone https://github.com/nginx/nginx
git checkout -b release-1.21.3 release-1.21.3
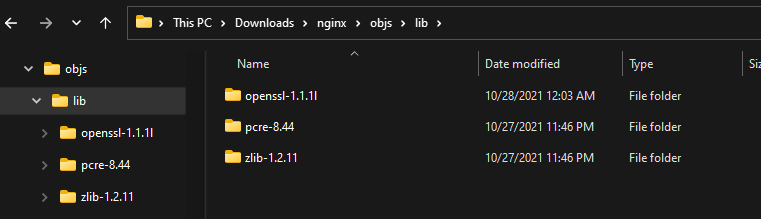
- Trong folder chứa source code, tạo folder objs và tạo folder con lib.
- Giải nén 3 thư viên đã download vào folder lib vừa tạo ở trên. (Với OpenSSL sau khi giải nén nhớ đổi tên folder
OpenSSL_1_1_1lthànhopenssl-1.1.1l)
- Chỉnh sửa source code auto/lib/openssl/makefile.msvc sửa thành:
# Copyright (C) Igor Sysoev
# Copyright (C) Nginx, Inc.


all:
	cd $(OPENSSL)

	perl Configure VC-WIN64A no-shared				\
		--prefix="%cd%/openssl" 				\
		--openssldir="%cd%/openssl/ssl" 			\
		$(OPENSSL_OPT)

	if exist ms\do_win64a.bat (						\
		ms\do_ms						\
		&& $(MAKE) -f ms\nt.mak					\
		&& $(MAKE) -f ms\nt.mak install				\
	) else (							\
		$(MAKE)							\
		&& $(MAKE) install_sw					\
	)
Chỉnh sửa auto/cc/msvc:
- Ở vào khoảng line 83
CFLAGS="$CFLAGS -W4"thànhCFLAGS="$CFLAGS -W3" - Ở line 14, chỉnh sửa:
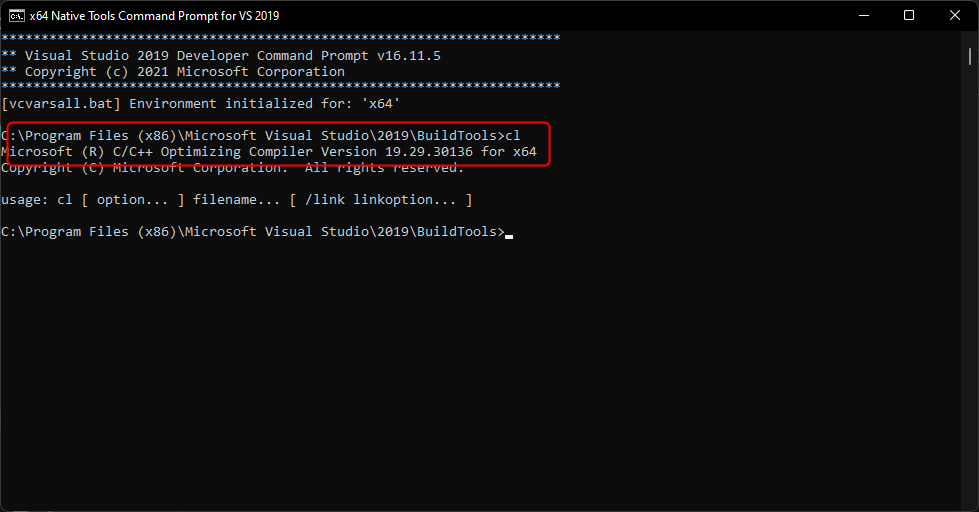
[...]
# NGX_MSVC_VER=`$NGX_WINE $CC 2>&1 | grep 'Compiler Version' 2>&1 \
#                                  | sed -e 's/^.* Version \(.*\)/\1/'`
NGX_MSVC_VER=19.29
[...]
Trong đó:NGX_MSVC_VERlà version của cl.exe. Kiểm tra bằng cách Mở x64 Native Tools Command Prompt for VS 2019
- Ở vào khoảng line 83
Mởi Git bash, cd vào thư mục source code và chạy:
auto/configure \
    --with-cc=cl \
    --builddir=objs \
    --with-debug \
    --prefix= \
    --conf-path=conf/nginx.conf \
    --pid-path=logs/nginx.pid \
    --http-log-path=logs/access.log \
    --error-log-path=logs/error.log \
    --sbin-path=nginx.exe \
    --http-client-body-temp-path=temp/client_body_temp \
    --http-proxy-temp-path=temp/proxy_temp \
    --http-fastcgi-temp-path=temp/fastcgi_temp \
    --http-scgi-temp-path=temp/scgi_temp \
    --http-uwsgi-temp-path=temp/uwsgi_temp \
    --with-cc-opt=-DFD_SETSIZE=1024 \
    --with-pcre=objs/lib/pcre-8.44 \
    --with-zlib=objs/lib/zlib-1.2.11 \
    --with-http_v2_module \
    --with-http_realip_module \
    --with-http_addition_module \
    --with-http_sub_module \
    --with-http_dav_module  \
    --with-http_stub_status_module \
    --with-http_flv_module \
    --with-http_mp4_module \
    --with-http_gunzip_module \
    --with-http_gzip_static_module \
    --with-http_auth_request_module \
    --with-http_random_index_module \
    --with-http_secure_link_module \
    --with-http_slice_module \
    --with-mail \
    --with-stream \
    --with-openssl=objs/lib/openssl-1.1.1l \
    --with-openssl-opt='no-asm no-tests -D_WIN32_WINNT=0x0501' \
    --with-http_ssl_module \
    --with-mail_ssl_module \
    --with-stream_ssl_module
Nếu chạy thành công thì kết quả trả về
checking for OS
+ MINGW64_NT-10.0-22000 3.1.7-340.x86_64 x86_64
+ using Microsoft Visual C++ compiler
+ cl version: 19.29
checking for MINGW64_NT-10.0-22000 specific features
creating objs/Makefile

Configuration summary
+ using PCRE library: objs/lib/pcre-8.44
+ using OpenSSL library: objs/lib/openssl-1.1.1l
+ using zlib library: objs/lib/zlib-1.2.11

nginx path prefix: ""
nginx binary file: "/nginx.exe"
nginx modules path: "/modules"
nginx configuration prefix: "/conf"
nginx configuration file: "/conf/nginx.conf"
nginx pid file: "/logs/nginx.pid"
nginx error log file: "/logs/error.log"
nginx http access log file: "/logs/access.log"
nginx http client request body temporary files: "temp/client_body_temp"
nginx http proxy temporary files: "temp/proxy_temp"
nginx http fastcgi temporary files: "temp/fastcgi_temp"
nginx http uwsgi temporary files: "temp/uwsgi_temp"
nginx http scgi temporary files: "temp/scgi_temp"
- Mở x64 Native Tools Command Prompt for VS 2019 (Run as Administrator), cd để thư mục chứa code và chạy lệnh
nmake /f objs\MakeFile
Chờ đợi 1 khoảng thời gian, nếu build thành công thì file nginx.exe sẽ được tạo ra ở trong folder objs.
Sử dụng
Để có thể sử dụng được chúng ta cần copy file nginx.exe vào 1 folder riêng có chứa 1 vài folder chứa cấu hình cần thiết. Tạo folder mới chẳng hạn nginx-1.21.3:
- Copy folder conf vào nginx-1.21.3
- Copy file objs/nginx.exe vào nginx-1.21.3
- Copy folder contrib vào nginx-1.21.3
- Copy folder doc/html vào nginx-1.21.3
- Tạo mới folder logs trong nginx-1.21.3
- Tạo mới folder temp/client_body_temp trong nginx-1.21.3
- Tạo mới folder temp/fastcgi_temp trong nginx-1.21.3
- Tạo mới folder temp/proxy_temp trong nginx-1.21.3
- Tạo mới folder temp/scgi_temp trong nginx-1.21.3
- Tạo mới folder temp/uwsgi_temp trong nginx-1.21.3
  nginx-1.21.3
  |-- conf
  |-- html
  |-- contrib
  |-- logs
  |-- temp
     |---- client_body_temp
     |---- fastcgi_temp
     |---- proxy_temp
     |---- scgi_temp
     |---- uwsgi_temp
  |-- nginx.exe
Để biết chi tiết xem thêm video